ID Codes
ID Codes

| Index | Rear Axle | Old ID Codes |
New ID Codes |
Engine Codes | Abbrevs | Links |
Email |
||
Jump down to ...
Planning your modifications.
Lexus V8 into TA45 Carina.
RA60 rack and pinion into RA28 Celica and TA45 Carina.
Electric windows.
Steering wheel emblem.
Lights buzzer.
Corona indicators.
Tail shafts.
Steering wheels.
Bumpers.
You must decide what you want your car to be.
Wanting "the best" is not detailed enough -
and your wallet will probably not give you "the best" anyway.
| Do you want ... | |
| - | the best drag car? |
| - | the best street car? |
| - | a daily driver? |
| - | a weekend car? |
| No car will do all the above well. | |
For my own car (1977 RA28 Celica), I want a daily driver.
It has to be driven to work every day, so it has to be reliable and 100% street legal.
Brakes and general safety are a high priority.
The occasional motorkhana means it needs reasonable power, good handling and good brakes.
Some parts like tyres, spark plugs and air filters can be changed for the day.
It will never win a motorkhana outright but it will at least be respectable.
It will only be driven on sealed roads, so rally suspension is not required.
I don't care about drag races, so a mega horsepower engine isn't required.
I am too lazy to wash and polish it often, so expensive paint jobs are not wanted.
However, it must be pretty enough to make heads turn.
It will be used as a part time cargo carrier, so no fancy leather interior.
I am half deaf, so an expensive sound system is not wanted.
A budget of A$10,000 (US$5,000) means few custom components can be used.
Instead lots of research has gone into using parts from other cars.
It must last for 10 years without further major expenses.
I know of expensive cars set up for drags, circuit racing, rallying.
I also know of cheap cars with only the basic rust removal and paint job.
Each is suitable for their owners but the above is what suits my circumstances and desires.
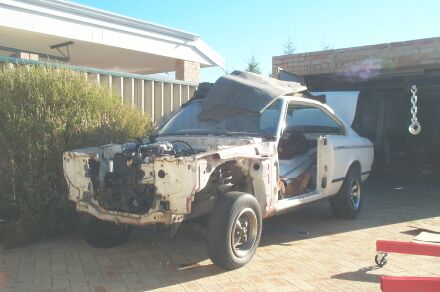
I found a rare 1980 TA45 Carina GT hardtop in a wrecking yard. The Carina was never sold in Australia, the 2 door is even rarer amd it looked so pretty, so I bought it. It has sustainal rust but nothing that can't be replaced by a competant panel beater. The mecanicals were all worn out but I am replacing nearly all of them with upgraded parts anyway. As an extra incentive, it shares its underpinnings with the RA40 Celica.
The 1UZ Lexus V8 was designed as a very compact engine.
Since the Carina has a very wide engine bay for a 4 cylinder car, putting them together seemed obvious.
There is no trouble with the strut towers.
Space is ample even with all accessories.
Carinas and Celicas (which share the same floorpan and engine bay) had 2 types of crossmember to suit the 2 types of engines offered.
The R series engines had a mid mounted sump which requires a forward bending crossmember.
The T series engines had a forward mounted sump which requires a backward bending crossmember.
The 1UZ engine has a forward mounted sump like the T series engine.
The Carina originally had the tiny 1600cc 2T-GEU engine with a T series crossmember, so this was no problem.
The engine mounts for the 1UZ need to be slightly further forward than the 2T mounts in order for the bell housing to clear the firewall.
The 1UZ mounts are for some reason exactly vertical, so the mounting surfaces are perfectly horizontal.
This certainly makes life easier for constructing new mounts on the crossmember.
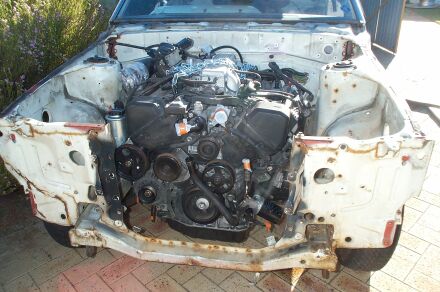
Clearing the steering box is not so easy.
All V8 engines have one bank slightly forward of the other bank.
Most V8s come from America and America is left hand drive.
That means that their steering box is on the left and needs a little more space on that side.
So, the V8 designer puts the left side slightly more forward.
Fine if you have LHD - I don't.
I have real problems making the exhaust clear the large recirculating ball steering box.
The exhaust is already very close to the engine, so making a new exhaust manifold probably won't help.
Recently I got an SA63 crossmember.
The SA63 crossmember gives me about 80mm of extra track, is legal under W.Australian laws (assumming I get it certified) and has power steering.
The RA28 and the TA45 have the same front chassis rails but the SA63 is different.
The SA63 crossmember is correct for sump clearance for 3T-GTE, 3S-GTE, 21R, 22R, some 1UZ-FE and some 1G-GTE engines.
Soarer 1UZ-FE engines have a different sump that is happier with the RA23/28/40 crossmember.
The mounts will need to be changed but that is just a welding job.
I belive the RA60 has the same crossmember as the SA63.
The front holes line up but the back holes are miles out.
I put it in any way just to see if it works.
Using the front holes only, the wheels are pulled about 40mm forwards and foul the guards (fenders).
Using the back holes only (after elongating the crossmembers holes with a file) everything lines up nicely.
I will have to take it out again and drill (and brace) new front holes 40mm further back.
The R&P still fouls the exhaust manifold but now I have enough clearance that I can rework the manifold around it.
The toe adjusting rods bolted in with only a small amount of swearing - no modifications were required but they are tight.
I havem't put the anti-sway bar from the SA63 in yet - it might have trouble clearing the sump or it might not.
A custom adjustable anti-sway bar would be nice anyway and avoids sump trouble.
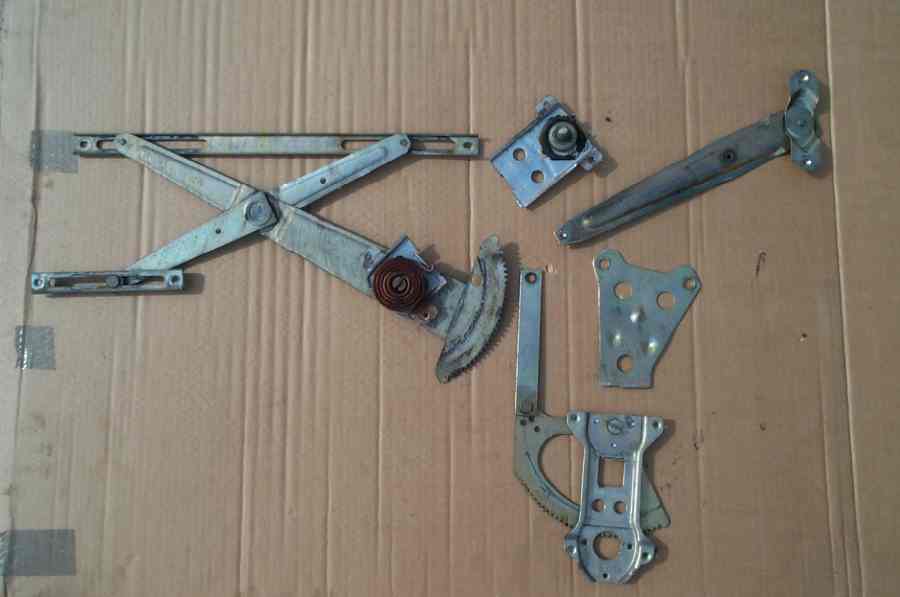
Find a Celica RA40 XX and remove everything you can see in the 2nd photo.
Also take everything electrical (switches, lights, motors, cables, etc).
You will need to cut the wiring loom inside the main cabin but take as much as you can that directly connects to the door.
Door lights are a bonus.
All pictures are for the passenger door on a right hand drive car (Australian).
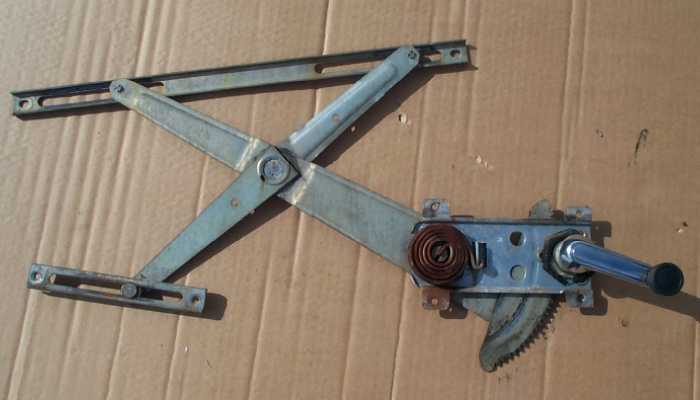
Original manual window winder internals.
Cut off the handle and everything near it but leave the spring mounts.
Make sure you don't cut off the geared wheel. We need it.
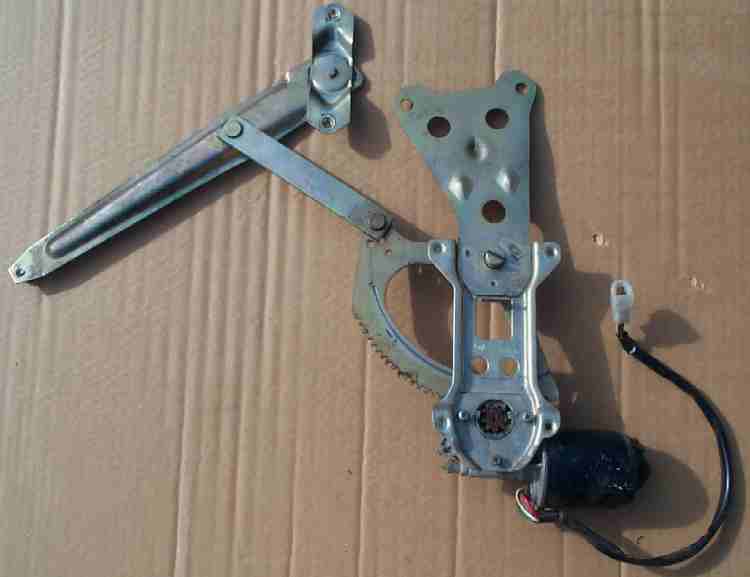
Original electric window winder internals (minus electrics).
Drill out the 3 welds holding the large plate at the top right and throw it away.
Drill out the pivot point at the top left and throw away the large arm.
Keep the short plain arm.
All the bits after some cutting.
Throw away the 3 bits in the top right corner.
Notice the existing hole in the manual winder geared wheel.
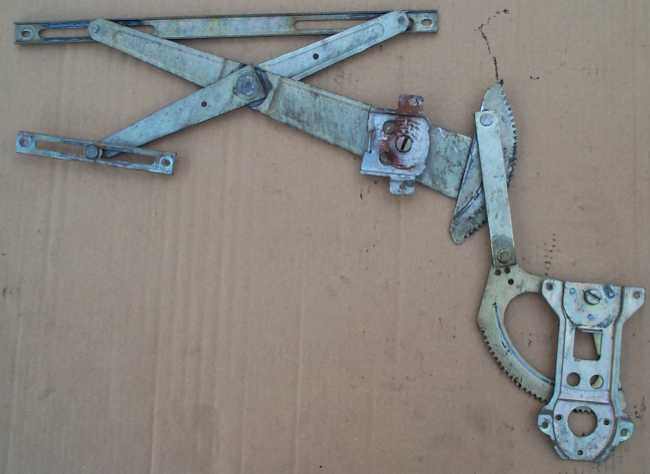
All the bits after some joining.
Unfortunately, the holes are not in the right place.
I drilled a new hole in the manual winder gear about 1.5cm lower (hidden in the photo by the arm).
I am not quite happy with the operation of the window when it is nearly closed.
Further experimentation is required for relocating the end points of the arm.
Relocating it should give more power when the window starts to rub against the rubbers.
Add both springs (more spring makes the heavy window easier to wind up).
I modified a spare manual winder spring in place of the weak electric winder spring.
Just grind the centre section of the spring so that it fits snug in the little grove.
Be careful not to put the spring backwards.
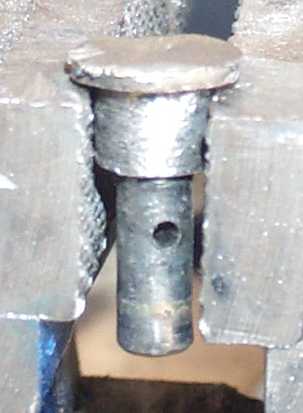
I made the pivot point out of the remains of the manual winder shaft for the handle.
A file, a hammer, an angle grinder and a hand drill can do wonders.
The hole in the shaft is for a split pin.
The flat part of the new pivot must be closest to the driver or passenger.
The long shaft was later cut shorter with an angle grinder (or hack saw).
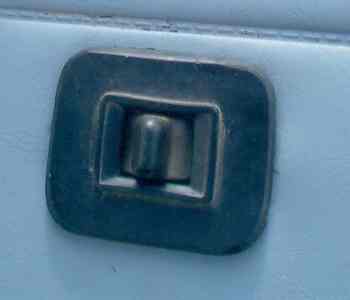
The passenger's door switch fits nicely into the hole in the door metal.
The switch was cut down and filed to shape.
The door trim was cut away until the switch fitted where the winder handle used to be.
The larger driver's door switch will hit the door metal, so it need to be closer to the front.
The plain blue wires for each side is +12V (use a fuse).
The white wires with black trace for each side connect to the chassis ground.
The red wires and the green wire with blue trace are connected left and right.
Other wires can be ignored.
As a bonus, you can also connect the red lights at the ends of the doors.
ST and GT models for 1970-1977 had these lights but the LT didn't.
All doors for all models for 1970-1977 used the same sheet metal
so all doors can be easily modifed to accept them.
Wire the door lights in parallel with the roof light using the 2 spare wires.

I replaced my cracked and worn steering wheel with an after market wheel.
Unfortunately, the aftermarket emblem didn't really suit the car.
At first I pulled the original Toyota emblem out of the old wheel
and glued it to the new wheel.
But the square edge made it look pretty nasty (except for the driver).
So a friend glued it to some doweling and put it in a lathe.
He reshaped the edge until it had a nice dome shape.
Bad news was that the glue peeled off half of the green paint.
So we scrapped off the rest of the paint, masked the front side with tape
and sprayed on a pretty blue colour.
Glued it onto the wheel and now it looks like Toyota put it there.
I have a bad habit of leaving my lights on when I park my car.
So I went to the local electronics shop and bought a 12 volt buzzer.
Added it between the door switch wire and the dash lights wire (parallel, not series).
Buzzer screams if the door is open and the lights are on.
Simple but effective.
Take the front side indicators from an RT104 Corona.
Needs a hole drilled for one of the mounting bolts.
If you don't like it then you can change back to the original indicators
because the originals are large enough to cover the extra hole.
All the Celica 2#, 3# and 4# tail shafts are interchangeable.
Cars with W or A series gearbox use the same front yoke.
Cars with a T series gearbox use a different yoke.
The tail shaft is the same - just change the front yoke to match the gearbox.
The more powerful 2#, 3# and 4# Celicas came with a 2 piece tail shaft.
They are interchangeable with the single piece tail shaft on the lesser models.
All 2#, 3# and 4# Celicas came with bolt holes for the centre bearing,
so either the single piece and 2 piece shaft can be put into any of the 2#, 3# and 4# Celicas.
The font yoke must still match the gearbox.
All Toyotas without airbags use the same spline to connect to the steering wheel to the steering column.
Some of the MX81 Cressidas had a wooden (not fake) steering wheel that fitted perfectly to my RA28 Celica.
Until mid 1974 all markets had nice slim smile shaped chrome bumpers. Most markets had similar bumpers for mid '74 to mid '77 but the RA22, RA24 and RA29 had large, ugly safety bumpers.
The front bumper can be replaced with a non America bumper. An earlier America front bumper can also be made to fit the later model. The early bumper mounts directly to the later chassis but you will need to make some brackets to fit the early style under bumper indicatorsas well.
The rear bumper for the RA24 coupe can also be taken from the earlier coupe.
The rear bumper for the RA29 liftback is not compatible with any coupe bumper. You will have to find one from a non American liftback (RA25, TA27, TA28, RA28, TA35, RA35).
All 2# and 3# coupe tail lights are interchangeable. They are not interchangeable with liftback tail lights. On earlier America coupes the number plate goes under the bumper and on later coupes the number plate goes between the tail lights. From 1970 to mid 1972 all coupes (American and otherwise) had flat tail lights. These flat lights are interchangeable with later coupe tail lights as long as teh centre piece is also changed.
All 2# and 3# liftback tail lights are interchangeable. They are not interchangeable with coupe tail lights. The 25 and 27 had 5 slim amber indicators on each side. The 28, 29 and 35 had 3 wide amber indicators on each side. The centre piece must be used with its corresponding indicators. RA29 centre pieces include the number plate holder. This can be swapped for a 25 or 35 number plate which holds only the LT/ST/GT and engfine size emblems but you will need to make a bracket to hold the number plate under the bumper.
Last updated 27 Dec 2007